


Today, I'm linking up the gift I made for Craftaholics Anonymous summer Handmade Gift Exchange.
{you can find the details of the exchange and what I received here}
My person was Michele. I wasn't entirely sure what I'd make for her, but was leaning toward something sewn, rather than crocheted. My hubby got me a beautiful Bernia (Bernette) sewing machine for my birthday back in February and I had just completed my first project: a checkbook cover from Amy Butler's Style Stitches. It was a gift for a friend and I finished it literally just before we left to meet up with her for dinner so I don't have any pictures. You'll just have to take my word that it turned out pretty good, especially for my first in-depth sewing project all by myself.
My original thought was to try out another "easy" bag pattern from the book, but even with fabric half price at Joann's, it is was going to cost double what I had budgeted for my gift. After a few questions to my giftee, Michele, I found out she has a Kindle and she likes the colors blue and green. I typed
"kindle slip case" into google and found this wonderful little tutorial by Park House Love which I pinned to one of my Pinterest boards for safe keeping.

How cute is that? The tutorial was for the ever-so-slightly larger Kindle than what my giftee had, but since I was using mid-weight upholstery fabric it ended up working out perfectly.

 Front
Front


"kindle slip case" into google and found this wonderful little tutorial by Park House Love which I pinned to one of my Pinterest boards for safe keeping.
How cute is that? The tutorial was for the ever-so-slightly larger Kindle than what my giftee had, but since I was using mid-weight upholstery fabric it ended up working out perfectly.

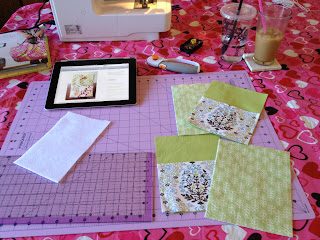
Here are my pieces cut out. I used the left-over upholstery fabric from the checkbook cover and cut up a flannel receiving blanket that I found in my son's dresser, buried and never used, for the inside lining to keep her Kindle protected.

Amy Butler calls for A LOT of interfacing for stability, so I interfaced the flannel lining and was going to pad it with fusible fleece as well, but I was afraid it would make it too tight and I didn't want the seams to be bulkier than they already were. As it was, I had to rip out a few seams a couple times and ended up having to sew the lining a tad smaller than the outside so it would fit better inside.
I taped together several layers from a cereal box the same size as her Kindle (4.5" x 6.5") to slide inside to make sure I hadn't made it too tight and just to be sure, I loaded the kids in the van and we drove to Best Buy to double check. I forgot they put those huge anti-theft devices on electronics so I was only able to slide the first 2.5" in the case, but it seemed to fit.
Overall, I am really pleased with how it turned out. I cut out the pattern on the pockets so they would be the same and incorporate the most blue. I added a large, white shank button and placed it so the elastic would lay relaxed over it to avoid puckering at the top. Since I didn't have the 1/8" elastic, I used just a tiny cord of elastic and had to hand stitch it into place.


Back
If I were to make another case like this, I'd either use a less bulky fabric (and NOT wash the upholstery fabric - that green fabric did not want to de-wrinkle no matter how many times I ironed it!), I'd only do one pocket or make the back pocket taller so the seams were off-set to decrease bulk.
I don't think I'm very good at the whole pretty packaging thing, but I slipped it in a craft ziplock baggy (just in case somewhere along the postal route it gets dropped in a puddle), wrapped it up in a few layers of light blue tissue paper and tied it together with light green twine.

I wrote a little card and slipped it under the twine and then mailed it off to Michele.
I hope see loves it and will get good use out of it.
No comments:
Post a Comment